With the footings all completed with concrete and reo in the bottom, and the material on site, it is time to get something up out of the ground.
Because the shed is a kit (come on we are handy – but that is taking it a bit too far) the bits and pieces are pretty much all in the right length/order.
So the forever boy spent the first half of the day pulling all the bits out, counting them, making sure everything was there etc, whilst I pretty much slept in and read.
The site is about 2 km from the shack, and I am not what you would call a morning person, so the Forever Boy (herewith referred to as FB) gets up early, heads over to site, get things in order and then comes back for breakfast.
I play 1950’s house wife (shack wife???) and cook breakfast and clean up. Realistically breakfast is really brunch so there is plenty of sleep in time.
So I go back over to site and the ‘ribs’ of the shed are lying on the ground in order. So for a shed this size there are 5 ribs.
After they have been *erm* modified to be for purpose – being extended because of the design of our floor (not a slab) – with extra pieces of steel welded/bolted on, they are pretty darn tall. It is interesting they way that all the elements of the structure are not terribly heavy separately, but when you put them together they certainly get some heft.
Anyway, the challenge is to get the very first ‘rib’ up. Again – I am not sure how they do this in the construction industry.. but it probably wasn’t like this.
Step 1. Find two able bodied office workers, whose extent of physical exertion for the past 6 months has been walking to the pub.
Step 2. Get them to push/pull up a shed piece that has to be located inside a footing hole that has been dug by a post hole digger that has an aversion to straightness.
Step 3. Raise ribs – ensuring that the extended length does not get caught on the reo.
Step 4. Swear and yell.
Step 5. Realise that that is not the place you want the rib to be and there is nothing to secure it to.
Step 6. Lower the section of shed.
Repeat from Step 2.
Well – you don’t have to have too many repeats.
We did eventually raise one rib and having tied it to the tractor for support – with two timber props and the help of a saw horse, raised another one.
FB then installed some girts to help with the sturdiness of the construction – and to stop it falling over, and then got some real help (not me) to push the other three ribs into place.
The real help ( of my brother in law, and my mum's boyfriend) was much better in that they whinged less, and were much stronger than me.
The roof purloin got installed through an innovative use of a tractor, a pallet and help from my brother in Law. There was also a rope involved – but not to minimise the chance of the installer falling off – but more to help the tractors hydraulics so that the pallet didn’t slip off.
A bit like this:
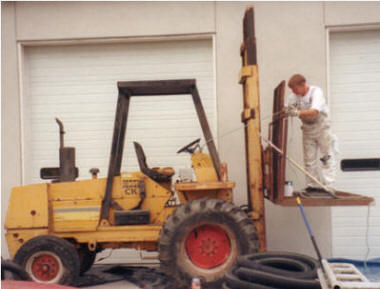
This picture is off a ‘what not to do’ website. This is Very similar to what was done – even down to the rope!
Of course it was much higher (like 4.6 m off the ground and it was windy. Of course. But at least the hazards were recognized!
At the end of the week – we have a recognizable shed.
 |
| Can you see what I mean by "ribs" now? |
A naked shed, but a shed nonetheless.
 |
| Very pleased with myself. With the shed on the RHS of the pic, and Mt Superbus in the background. |
No comments:
Post a Comment